Robocat
- Table of contents
- Robocat
Che cos'è / Description
Robocat è un amigurumi dotato di un circuito elettronico per accendere i suoi LED e scegliere tra varie possibilità di lampeggiamento grazie ad un collegamento modificabile ai pin di un LilyTiny.
Robocat is an amigurumi with an electronic circuit to turn its LEDs on and choose among several flashing modes thanks to a multiple choice connection to the pins of a LilyTiny board.
Componenti principali / Main parts
- LilyTiny
- Due LED
- Portabatteria da 3V con switch
- Batteria da 3V
- LilyTiny
- Two LEDs
- 3V battery holder with switch
- 3V Battery
Come si fa / How to
Lista dei materiali / Components
Amigurumi:- Filato di media grossezza celeste e blu
- Uncinetto 2 1/2
- Filo metallico
- Filo da cucito conduttore
- Feltro bianco
- Filo da ricamo bianco, nero
- Ago da ricamo
- Ago da lana
- Fibra di poliestere per imbottitura
- 1 perlina baguette 6mm nera
- 6 perline 2mm nere
- Light worsted weight yarn in pale blue and dark blue
- Crochet hook size 2.50 mm
- Thin wire
- Conductive thread
- White felt
- Embroidery floss in white and black
- Embroidery needle
- Yarn needle
- Polyester fiberfill
- 1 6mm bugle bead in black
- 6 2mm seed beads in black
- LilyTiny
- Portabatteria con switch
- LED rosso da 5mm
- LED verde da 3mm
- Batteria 3V
- Filo da cucito conduttore
- 4 bottoni automatici di metallo
- LilyTiny
- Switched battery holder
- Red 5mm LED
- Green 3mm LED
- 3V Battery
- Conductive thread
- 4 snap fasteners
Schema
Istruzioni / Instructions
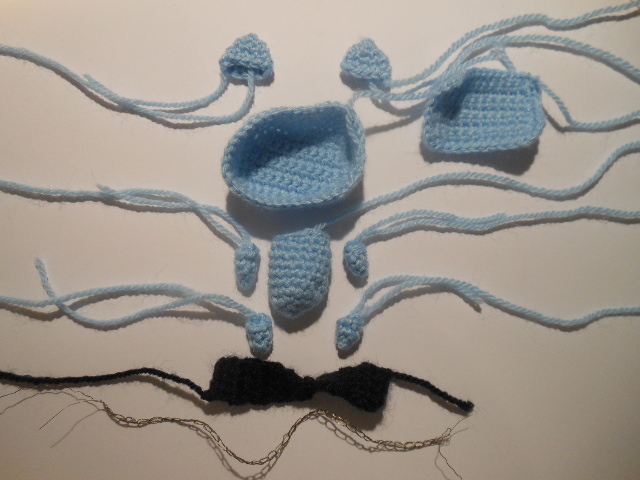
Abbiamo preparato tutte le parti dell'amigurumi.
We got all of the amigurumi parts ready.
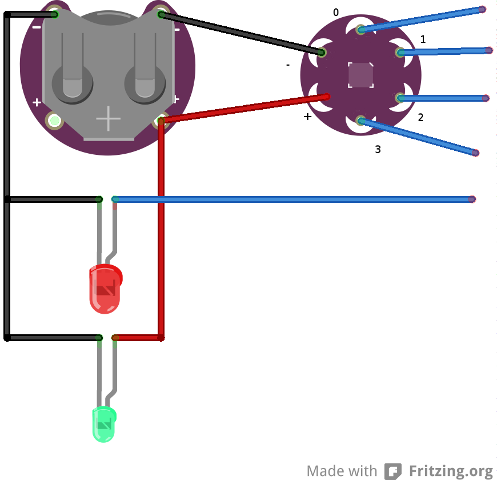
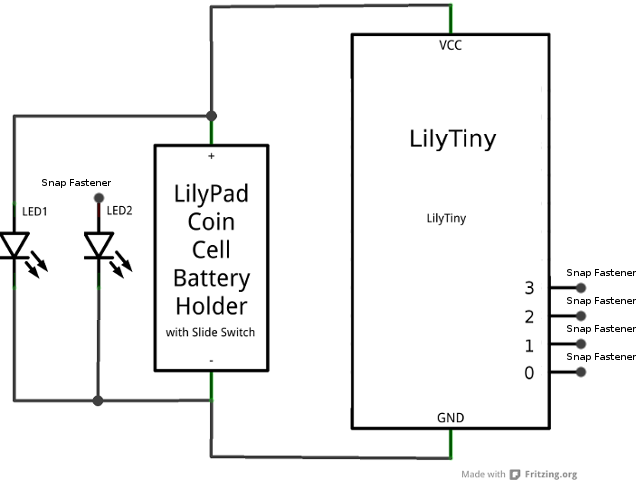
Poi abbiamo preparato lo schema del circuito.
Il circuito ha un piccolo LED verde che si accende quando mettiamo lo switch su ON e uno rosso che si accende e lampeggia in modo diverso a seconda del pin al quale viene collegato.
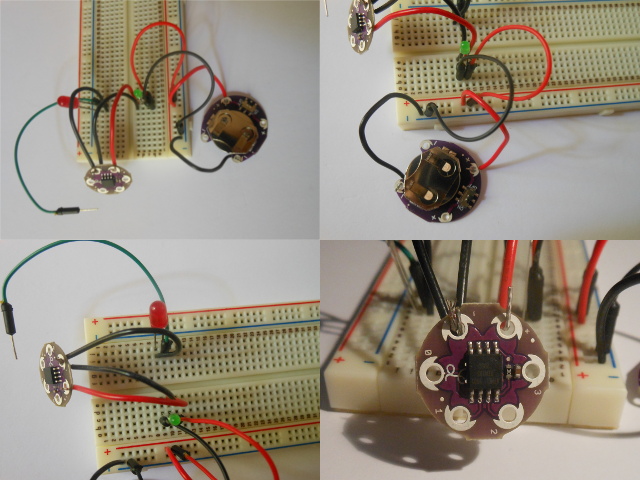
Abbiamo prima testato il circuito sulla breadboard.
Then we prepared the schema of the circuit.
The circuit has a little green LED that turns on when we switch on and a red one that turns on and flashes in different ways according to the pin it is connected to.
We first tested the circuit on the breadboard.
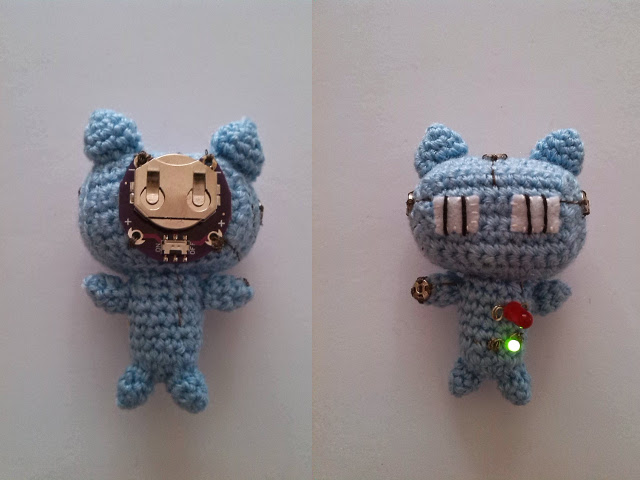
Dopo aver ricamato la faccia, abbiamo applicato LilyTiny al suo interno. Con il filo conduttivo abbiamo cucito i collegamenti ai pin. Abbiamo imbottito la testa, poi abbiamo attaccato tre bottoni automatici ai lati e al di sopra della testa collegandoli ai pin 0, 1 e 2. Sulla nuca abbiamo collegato il portabatteria.
After embroidering the face, we put LilyTiny inside. We connected the pins by the conductive thread. We stuffed the head, then we attached three snap fasteners on the sides and top of the head, connected to pins 0, 1 and 2. We connected the battery holder on the back of the head.

Abbiamo attaccato le orecchie alla testa e siamo passati al corpo. Dopo averlo imbottito e attaccato alla testa, abbiamo attaccato le zampe. Abbiamo cucito un automatico alla zampa destra con il filo collegato al pin 3.
Abbiamo preparato due LED accorciando le parti metalliche e chiudendole ad anello, poi li abbiamo cuciti al corpo. Abbiamo sistemato verso destra il negativo dei LED e li abbiamo collegati al negativo dell'alimentazione. Il positivo del LED verde è stato collegato direttamente al positivo del portabatteria.
A questo punto abbiamo fatto un primo test per verificare il funzionamento del LED verde.
We attached the ears in place, then we passed to the body. After stuffing the body, we attached it to the head, the we attached the arms and legs, too. We sewed a snap fastener to the right arm with the yarn connected to pin 3.
We shortened the legs of the LEDs and bent them in rings, then we sewed them to the body. We put the LEDs' negative to the right side of the body and connected them to the negative of the battery holder. The positive leg of the green LED was directly connected to the positive of the battery holder.
At this point we tested the connection to the green LED.
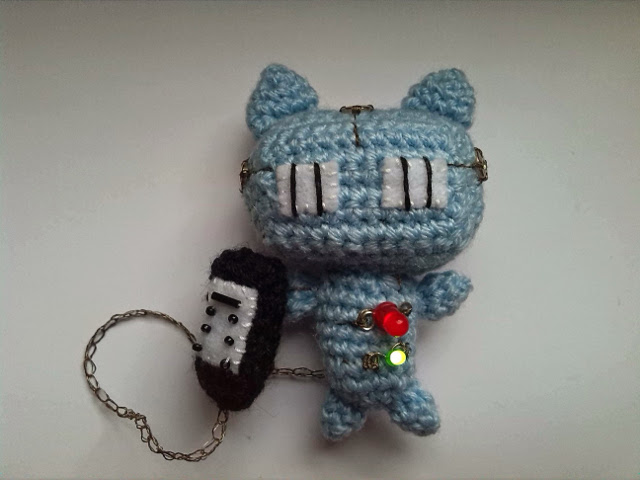
Per finire, abbiamo ricamato le perline sul feltro per fare la tastiera del telecomando, abbiamo attaccato la coda al telecomando e a un automatico. Poi abbiamo collegato l'altro capo della coda al corpo e infine al positivo del LED rosso.
Collegando l'automatico del telecomando agli automatici del corpo di Robocat, otteniamo i diversi effetti del lampeggiameno del LED rosso.
We completed our project stitching the black beads on the white felt for the front of the remote control, then we sewed the tail to the remote control and to a snap fastener. Then we connected the other end of the tail to the body and to the positive leg of the red LED.
Connecting the snap fastener of the remote control to the snap fasteners of the body, we can see four different effects on the red LED lightening.
Riferimenti / References
- Crobots, by Nelly Pailloux (Andrews McMeel Publishing). Copyright (C) 2009 by Ivy Press Limited, 978-0-7407-7827-8.
- Getting Hands-On With Soft Circuits: A Workshop Facilitator's Guide, by Emily Lovell
- Tiny Monster Tutorial, by Emily Lovell, Jie Zi, and Natalie Freed